Quick Pickled Red Onions Recipe
Quick Pickled Red Onions Recipe
Quick pickled red onions are one of the easiest ways to add tangy crunch and vibrant color to almost any savory dish. With a simple hot vinegar brine and a handful of pantry ingredients, you can turn sharp raw onions into mellow, zesty slices that keep in the fridge for days.
They’re ideal for topping tacos, grain bowls, salads, burgers, sandwiches, roasted vegetables, and more—and you can tailor the flavor with herbs, spices, and chiles.
Why Make Quick Pickled Red Onions?
- Bright, tangy flavor: Vinegar softens the onion’s harsh bite and adds a pleasant, zippy acidity.
- Great texture: The onions stay crisp but lose the aggressive sharpness of raw onion.
- Versatile: Works with tacos, salads, burgers, sandwiches, bowls, egg dishes, and charcuterie.
- Fast and easy: No canning; just heat, pour, and chill. Ready to use in as little as 30 minutes.
- Meal-prep friendly: Keeps in the fridge for up to about 2 weeks, so you always have a flavorful topping on hand.
Ingredients for Quick Pickled Red Onions
Core Ingredients
- 2 medium red onions, peeled
- 1 cup apple cider vinegar
- Or white vinegar for a cleaner, more neutral flavor.
- 1 cup filtered water
- 2 teaspoons sea salt or kosher salt
- 1 tablespoon sugar
- Cane, coconut, or brown sugar all work; sugar balances acidity.
Optional Flavor Add-Ins
Customize your brine with any combination of:
- Lime or lemon slices
- Whole peppercorns
- Garlic cloves (lightly crushed)
- Fresh herbs (dill, cilantro, parsley, thyme)
- Spices (mustard seeds, fennel seeds, coriander seeds, red pepper flakes, pickling spice)
- Sliced fresh hot peppers (jalapeño, serrano, etc.) for heat
Equipment You’ll Need
- Sharp chef’s knife or mandoline slicer
- Medium saucepan
- Heatproof glass jar (about 1 pint or larger) with a tight-fitting lid
- Measuring cups and spoons
- Spoon or tongs for packing onions into the jar
Step-by-Step: How to Make Quick Pickled Red Onions
1. Slice the Red Onions
- Peel the red onions.
- Using a sharp knife or mandoline, slice into very thin rings or half-moons (about ⅛–¼ inch thick).
- Thinner slices absorb flavor more quickly and develop a delicate, crisp texture.
You can slice pole-to-pole (root to tip) for slightly firmer texture, or into half-moons for a more classic look.
2. Prepare the Pickling Brine
In a medium saucepan:
- Combine:
- 1 cup vinegar
- 1 cup filtered water
- 2 teaspoons salt
- 1 tablespoon sugar
- Add any whole spices or garlic you’re using (peppercorns, mustard seeds, red pepper flakes, etc.).
- Bring the mixture to a gentle boil, stirring to dissolve the salt and sugar.
- Let it bubble for about 2 minutes to fully dissolve and lightly infuse flavors.
Remove from heat once everything is dissolved.
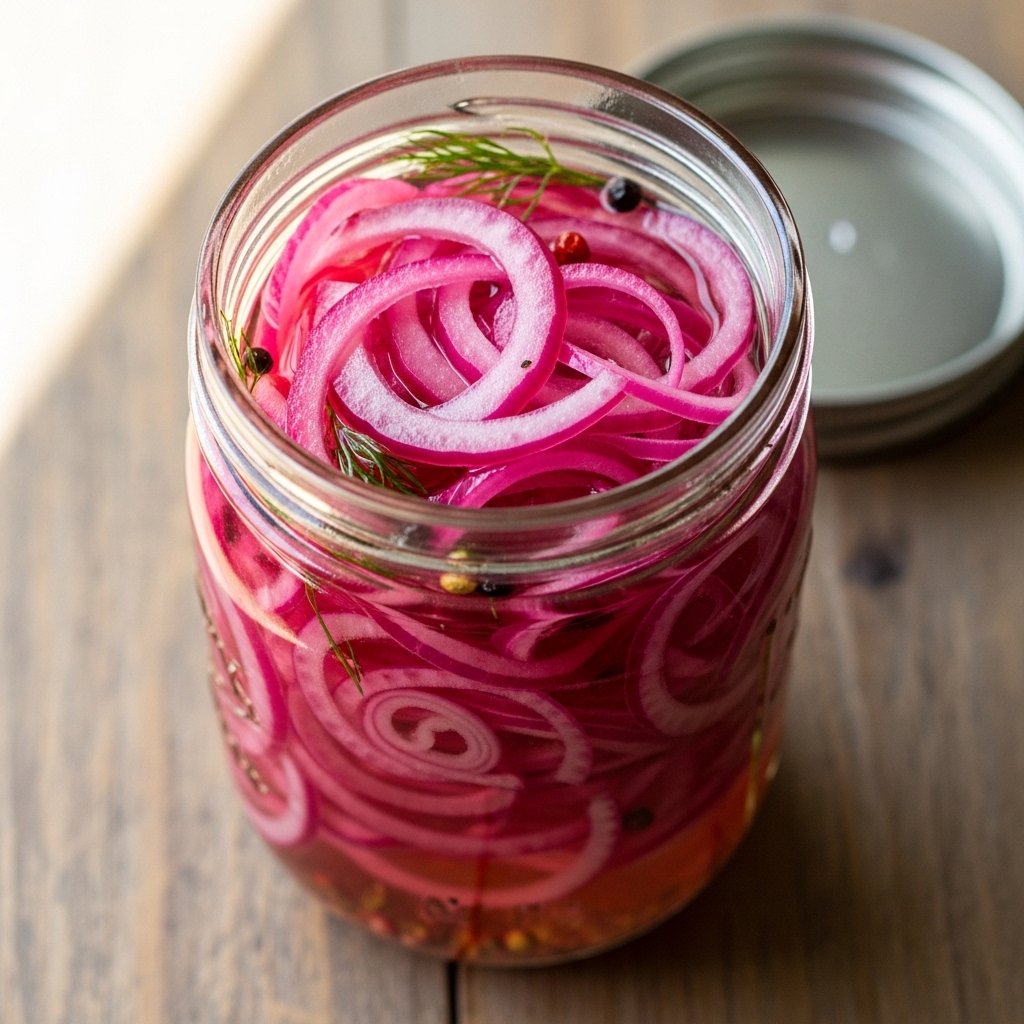
3. Pack the Onions and Add Brine
- Place the sliced onions into your clean, heatproof glass jar.
- If using fresh herbs, lime slices, or sliced hot peppers, tuck some between layers of onions.
- Slowly pour the hot brine over the onions, pressing gently with a spoon to remove air pockets.
Make sure:
- All onion slices are fully submerged in the liquid.
- If needed, press onions down or add a small piece of parchment or a clean weight to keep them under the brine.
4. Cool, Chill, and Store
- Let the jar cool at room temperature for about 1–2 hours, until it’s just warm.
- Seal with the lid and transfer to the refrigerator.
Timing:
- You can start using the onions in as little as 30 minutes for a lightly pickled flavor.
- For best flavor and deeper color, let them sit several hours or overnight.
Over time, the onions will turn a bright pink as the acidic brine draws out pigment from the red skins—that color change is a sign the pickling is working perfectly.
Tips, Variations, and Troubleshooting
Flavor and Spice Variations
Use the base recipe and experiment with add-ins:
- Citrusy:
- Add 2–3 slices of lime or lemon per jar for bright, fresh notes.
- Spicy:
- Add ½ thinly sliced jalapeño or a pinch of red pepper flakes for heat.
- Herby:
- Add 1–2 sprigs of dill, cilantro, parsley, or thyme for fresh, herbal aroma.
- Warm and aromatic:
- Add ½ teaspoon mustard seeds or coriander seeds for earthy complexity.
- A clove or two of garlic adds subtle punch.
Storage and Food Safety
- Store in the refrigerator, tightly sealed.
- Best quality is usually within about 2 weeks.
- Always use a clean utensil to remove onions from the jar to avoid introducing bacteria.
- Make sure onions stay fully submerged in brine between uses.
Ways to Use Quick Pickled Red Onions
Quick pickled onions are incredibly versatile:
- Tacos & Mexican dishes:
- Spoon over tacos, burritos, quesadillas, nachos, or tostadas.
- Salads & grain bowls:
- Scatter over green salads, pasta salads, or bowls with rice, quinoa, or farro.
- Burgers & sandwiches:
- Use in place of raw onion on burgers, grilled cheese, pulled pork, or grilled chicken sandwiches.
- Breakfast & egg dishes:
- Top scrambled eggs, frittatas, breakfast burritos, or shakshuka.
- Charcuterie & cheese boards:
- Add a small dish of pickled onions alongside cured meats, cheeses, and crackers.
- Roasted veggies & bowls:
- Use as a bright, acidic counterpoint to rich roasted vegetables or hearty grain-and-protein bowls.
Pro Tips for Perfect Quick Pickled Onions
- Slice thin and even:
A mandoline helps achieve consistent thickness so all slices pickle at the same rate. - Use the right jar size:
Choose a jar that holds the onions snugly but allows enough space for all slices to be submerged in brine. - Taste and adjust next batch:
If you want sweeter, add more sugar next time; for sharper, use more vinegar or less water. - Make extra:
A second jar rarely goes to waste—they’re easy to finish and only get better after a day or two. - Use leftover brine:
If you have extra brine, use it to quick-pickle sturdy vegetables like carrots, radishes, or green beans.
Quick Pickled Red Onions (Printable-Style Recipe)
Ingredients
- 2 medium red onions, thinly sliced
- 1 cup apple cider or white vinegar
- 1 cup filtered water
- 2 teaspoons sea salt or kosher salt
- 1 tablespoon sugar
- Optional: peppercorns, sliced jalapeño, lime slices, fresh herbs, garlic cloves, mustard seeds
Instructions
- Pack sliced red onions into a clean, heatproof jar.
- In a saucepan, combine vinegar, water, salt, sugar, and any dried spices/garlic. Bring to a boil, stirring to dissolve.
- Pour hot brine over onions, ensuring they’re fully submerged. Add any fresh herbs or citrus slices.
- Cool to room temperature, then cover and refrigerate.
- Use once chilled (after at least 30 minutes), with best flavor after several hours or overnight. Enjoy within about 2 weeks.
Common Questions
How long do quick pickled red onions last?
Generally up to about 2 weeks in the fridge with best texture and flavor in the first week or so.
Can I use different onions?
Yes—yellow, white, or sweet onions also work. Red onions simply give the most striking color and slightly sweeter profile.
Can I reuse the brine?
You can often reuse clear, well-refrigerated brine one more time within about a week for another small batch, but the flavor and acidity will be weaker. For the best and safest results, it’s ideal to make new brine.
Why are my onions so bright pink?
That’s normal and expected. The vinegar is pulling color from the red onion layers, giving you that vivid pink hue.
My onions are soft, not crisp. What happened?
They may have been sliced very thin and soaked for a long time, or the brine was extremely hot for an extended period. For crisper onions, slice just slightly thicker and avoid simmering them in brine—simply pour the hot brine over and let cool.