How to Cook Steak on the Stove
How to Cook Steak on the Stove
Pan‑searing steak on the stovetop is one of the most reliable ways to achieve a deeply browned crust and a tender, juicy interior using only a skillet and a few basic ingredients. Unlike grilling, you’re not limited by weather, and you have precise control over heat.
By mastering stovetop steak, you can recreate a steakhouse experience any night of the week—no special equipment required, just a hot pan, good steak, and a little technique.
Essential Equipment and Ingredients
Having the right tools and pantry staples makes everything easier and more consistent.
Equipment
- Heavy skillet:
A cast‑iron or heavy stainless steel skillet holds heat well and creates that signature sear. Thin nonstick pans tend to cool quickly and won’t brown as deeply. - Tongs:
For flipping steak and holding it on its edge to sear fat caps or sides. - Instant‑read thermometer:
The most accurate way to check doneness. It removes guesswork and helps prevent overcooking. - Spoon:
For basting the steak in hot butter during the final minutes of cooking.
Core Ingredients
- Thick‑cut steak (1–1.5 inches):
Good choices include:- Ribeye
- New York strip
- Filet mignon
- T‑bone or porterhouse
- High‑heat oil:
- Canola, grapeseed, vegetable, or avocado oil.
These oils tolerate high heat without burning.
- Canola, grapeseed, vegetable, or avocado oil.
- Butter:
Added toward the end for basting, richness, and flavor. - Kosher salt and freshly ground black pepper:
Simple, effective seasoning that lets the steak’s flavor shine. - Optional aromatics:
- Crushed garlic cloves
- Fresh thyme or rosemary
- Shallots
These aromatics perfume the butter and pan juices, giving your steak a subtle, restaurant‑style finish.
Choosing the Right Steak for the Stovetop
Not all cuts behave the same in a hot skillet. Here’s a quick comparison to help you choose.
| Cut | Characteristics | Why It Works on Stovetop |
|---|---|---|
| Ribeye | Rich marbling, very flavorful, quite tender | Forgiving, stays juicy, great crust |
| New York strip | Moderate marbling, firmer bite, beefy flavor | Classic steakhouse style, excellent sear |
| Filet mignon | Very lean, extremely tender, mild flavor | Luxurious texture, benefits from butter basting |
| T‑bone/Porterhouse | Strip + tenderloin separated by a bone | Dramatic presentation, requires careful edge sear |
For beginners, ribeye or strip are great starting points: they have enough fat to stay juicy and respond well to high heat.
Preparing Your Steak: The Setup for Success
Proper preparation makes searing more predictable and flavorful.
1. Bring Steak Toward Room Temperature
- Remove steak from the refrigerator 30–60 minutes before cooking.
- This takes the chill off and helps the steak cook more evenly from edge to center.
2. Pat the Steak Very Dry
- Use paper towels to blot all surfaces, including edges.
- Moisture on the surface turns to steam and prevents browning.
- A dry surface = better crust.
3. Season Generously
- Just before cooking, season both sides and the edges with:
- Kosher salt
- Freshly ground black pepper
You want a visible, even coating. The salt helps build flavor in the crust; pepper adds aroma and heat.
How to Cook Steak on the Stovetop: Step-by-Step
Step 1: Preheat the Skillet
- Place your empty skillet over medium‑high to high heat.
- Let it heat for at least 2–3 minutes, until very hot.
- A drop of water should immediately sizzle and evaporate.
A truly hot pan is essential for that deep, even sear.
Step 2: Add Oil
- Pour in a thin layer of high‑heat oil, enough to lightly coat the bottom.
- Swirl to distribute.
- When the oil shimmers and moves easily, it’s ready.
If you see faint wisps of smoke, that’s usually the right moment to add the steak.
Step 3: Sear the First Side
- Holding the steak with tongs, gently lay it in the pan away from you to avoid splashes.
- Once it’s down, don’t move it for at least 2–3 minutes, depending on thickness.
During this time, the crust develops. If you nudge the steak and it sticks, it’s not ready to turn yet; when it releases more easily, a crust has formed.
Step 4: Flip and Add Butter and Aromatics
- Flip the steak using tongs. You should see a nicely browned surface.
- Immediately add to the pan:
- 1–3 tablespoons butter (depending on pan size)
- Optional: a few crushed garlic cloves and sprigs of thyme or rosemary
As the butter melts and foams:
- Tilt the skillet slightly so the butter pools at one end.
- Use a spoon to baste the top of the steak repeatedly with the hot, foaming butter.
- Baste for 30–60 seconds at a time, then return the pan flat to maintain even contact with the heat.
Butter basting adds flavor, helps the top side cook gently, and deepens browning.
Step 5: Monitor Doneness
Continue cooking, flipping once or twice if needed to prevent hot spots, and monitor temperature with an instant‑read thermometer inserted sideways into the thickest part.
Use these guiding temperatures:
Steak Doneness Temperature Guide
| Doneness | Remove From Heat At | Final Temp After Rest | Interior Look |
|---|---|---|---|
| Rare | 115–120°F (46–49°C) | 120–125°F (49–52°C) | Very red, cool to warm center |
| Medium‑rare | 120–125°F (49–52°C) | 130–135°F (54–57°C) | Warm red center, very juicy |
| Medium | 130–135°F (54–57°C) | 135–140°F (57–60°C) | Pink center, slightly firmer |
| Medium‑well | 140–145°F (60–63°C) | 145–150°F (63–66°C) | Thin pink line, mostly brown |
| Well done | 150–155°F (66–68°C) | 155–160°F (68–71°C) | No pink, very firm throughout |
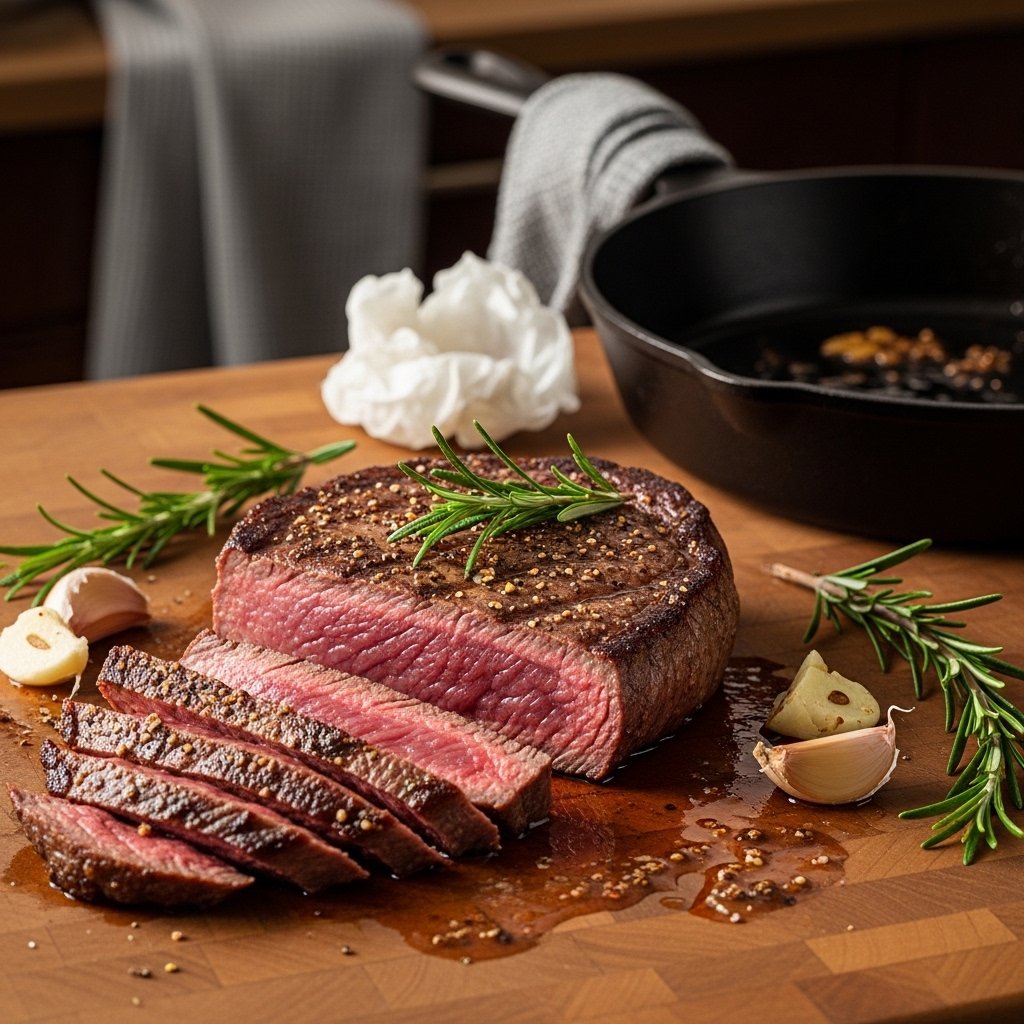
Most steakhouse‑style steaks are cooked to medium‑rare or medium to preserve tenderness and juiciness.
Step 6: Rest the Steak
- Transfer the steak to a warm plate or a wire rack set over a tray.
- Tent loosely with foil if your kitchen is cool, but don’t seal tightly.
- Let it rest for 5–10 minutes.
Resting allows the juices to redistribute; cutting too soon means those juices run onto the plate instead of staying in the meat.
Pro Tips for a Perfect Stovetop Steak
- Choose thicker cuts:
Steaks 1–1.5 inches thick are more forgiving; thin steaks overcook in a flash. - Don’t fiddle with it:
Let each side sear undisturbed before flipping for maximum crust. - Use your senses:
You should hear a steady sizzle, not a roaring smoke storm or a quiet simmer. Adjust heat accordingly. - Edge searing:
For steaks with a fat cap (like ribeye or strip), hold the steak on its edge with tongs to render the fat and crisp it. - Season simply:
Salt and pepper are often enough. You can always finish with a flavored butter or sauce. - Resting isn’t optional:
The difference between cutting immediately and waiting 5–10 minutes is dramatic in terms of juiciness.
Common Stovetop Steak Mistakes (And How to Avoid Them)
1. Overcrowding the Pan
Problem: Multiple steaks jammed into one pan cool the surface, causing steaming instead of searing.
Fix: Cook one or two steaks at a time, depending on pan size. The steak should have space around it.
2. Starting with a Cold Steak
Problem: The outside overcooks before the inside reaches your preferred temperature.
Fix: Let steak sit out 30–60 minutes before cooking, especially if thick.
3. Turning Too Often or Too Soon
Problem: Moving the steak constantly prevents the crust from forming.
Fix: Give each side 2–3 minutes of undisturbed searing before flipping—then flip only as needed.
4. Not Drying the Steak
Problem: Surface moisture creates steam and disrupts browning.
Fix: Thoroughly pat dry before seasoning.
5. Skipping the Rest
Problem: Juices rush out when you slice, leaving the meat drier.
Fix: Rest at least 5 minutes for smaller steaks; up to 10 minutes for thicker cuts.
Variations: Beyond the Basic Pan Sear
Once you’re comfortable with the classic stovetop method, you can branch out into slightly more advanced techniques.
Stovetop-to-Oven Method
Ideal for very thick steaks (1.5–2 inches).
- Sear steak in a hot skillet on the stovetop:
- 2–3 minutes per side, plus edge searing if needed.
- Transfer the oven‑safe skillet to a preheated 400°F (204°C) oven.
- Finish cooking until steak reaches 5–10°F below your target final temperature.
- Rest before slicing.
This method gives a robust crust and more even doneness from edge to center.
Butter Baste Finish
You can also save the butter and aromatics for the last 1–2 minutes of stovetop cooking:
- Add butter, garlic, and herbs near the end.
- Baste continuously with the foaming butter.
- This minimizes the risk of burnt milk solids while still delivering rich flavor.
Reverse Sear (For Maximum Edge-to-Edge Control)
- Cook the steak in a low oven (around 200°F / 93°C) or other gentle heat source until just under your desired doneness.
- Rest briefly, then sear in a very hot skillet for 1–2 minutes per side to build a crust.
Reverse searing is excellent for thick cuts and helps ensure even pinkness throughout.
Serving Your Stovetop Steak
Slicing
- Use a sharp chef’s knife or carving knife.
- For maximum tenderness, always slice against the grain (perpendicular to the direction of muscle fibers).
Plating and Finishing Touches
Consider these simple, high-impact finishes:
- Compound butter:
A pat of butter mixed with herbs, garlic, or blue cheese placed on top of the hot steak. - Pan juices:
Spoon over any flavorful browned butter and juices from the pan. - Flaky salt:
A small sprinkle of flaky sea salt right before serving enhances texture and flavor.
Side Dishes
Stovetop steak pairs especially well with:
- Roasted or mashed potatoes
- French fries or crispy potatoes
- Sautéed mushrooms or onions
- Creamed spinach or simple sautéed greens
- A crisp salad or roasted vegetables
FAQs
How long to cook a steak on the stove for medium-rare?
Sear 3–4 minutes per side over high heat, aiming for an internal temperature of 125°F. Rest 5 minutes.
Best pan for stovetop steak?
Cast-iron holds heat best for the crust. Stainless works too—preheat fully.
Can I cook frozen steak on the stove?
Thaw first in the fridge for even cooking. Frozen leads to uneven doneness.
What oil is best for searing steak?
High-smoke-point oils like avocado or canola. Avoid extra-virgin olive oil—it smokes.
How do I know steak is done without a thermometer?
Press test: medium-rare bounces back like a chin tip. Cut a small slit if unsure.