Why Are Mums Turning Brown? 7 Proven Fixes to Revive Them Fast
Why Are Mums Turning Brown? 7 Proven Fixes to Revive Them Fast
You set out mums for a burst of color, not a patch of crisp brown petals two weeks later. When chrysanthemums start turning brown almost overnight, it feels like you’ve done something wrong—but in most cases, the plant is simply reacting to stress you can fix. Browning mums are almost always sending a message about water, light, temperature, or soil conditions, and once you understand that message, you can turn things around surprisingly fast.
This guide breaks down the major causes of mums turning brown, how to tell them apart, what to do right now to save your plants, and how to prevent the same issues next season.
Why Mums Turn Brown: Natural Aging vs Real Problems
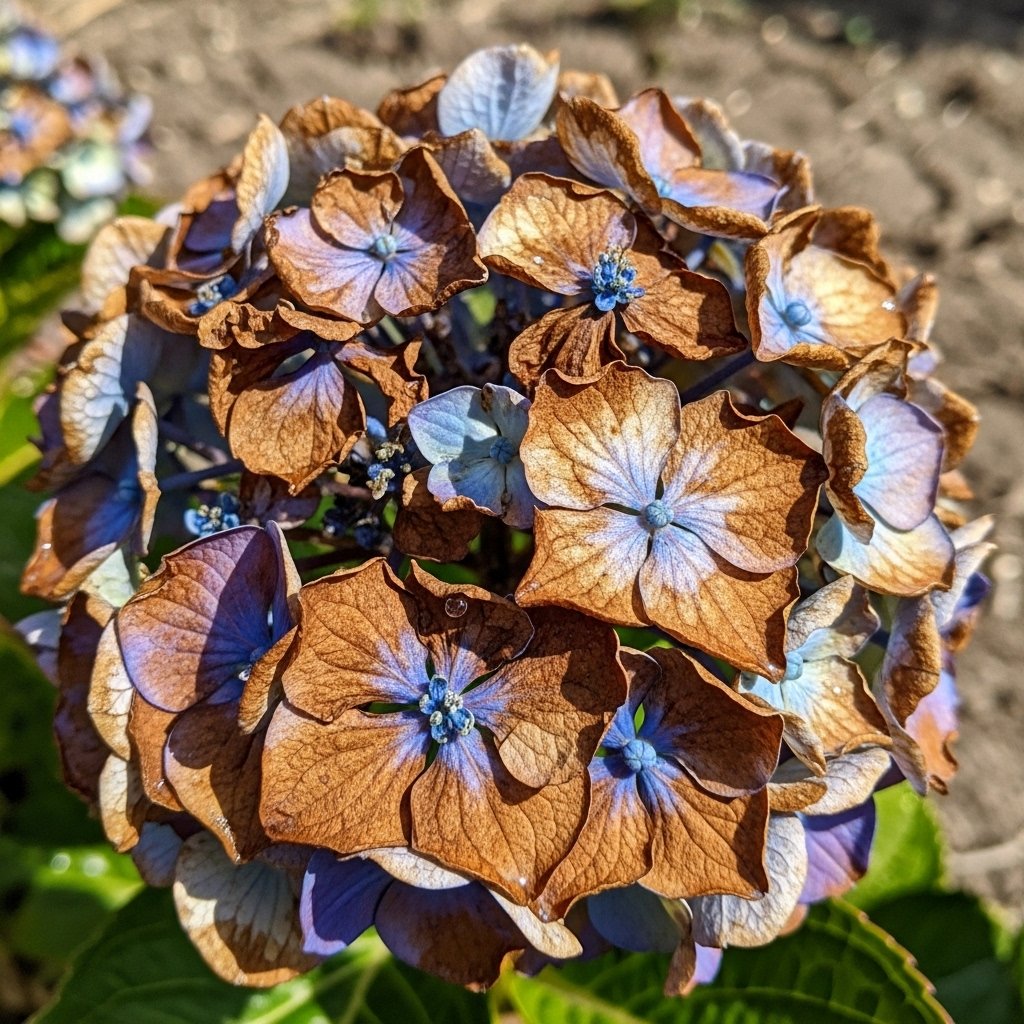
Before you panic, remember that mums, like any flowering plant, eventually age out of bloom; petals will fade and turn brown after 7–14 days, especially in harsh weather. That kind of browning starts at the oldest flowers while new buds still look fresh, and the plant otherwise appears healthy.
Premature browning is different. When buds never open, petals crisp quickly after purchase, or whole sections of the plant brown at once, you’re usually dealing with stress rather than simple age. In home gardens and containers, more than 90% of early browning cases trace back to a short list of causes: inconsistent watering, too much or too little sun, poor drainage, frost or heat damage, or nutrient and salt issues.
Top Causes of Mums Turning Brown (And How to Diagnose Them)
1. Water Stress: Too Dry or Too Wet
Mums are shallow‑rooted and notoriously sensitive to erratic watering.
Signs of underwatering:
- Buds shrivel and turn brown before opening.
- Petal tips crisp, especially on the outer ring of flowers.
- Foliage may wilt or feel papery despite recent sun.
Signs of overwatering or poor drainage:
- Flowers turn brown and mushy rather than crisp.
- Lower leaves yellow, then brown.
- Soil feels soggy, and the pot is heavy for days after watering.
In both cases, roots are stressed and can’t move water efficiently to the blooms, so petals dry or collapse.
2. Sun and Heat Stress
Chrysanthemums love sun, but the “more is better” rule has limits.
- Too little sun: blooms are weak, stems stretch, and flowers wilt and brown early due to low energy.
- Too much intense sun or heat: petals bleach, then dry and brown, particularly on the side facing the hottest exposure.
Plants moved straight from a cool greenhouse to all‑day sun often brown within days because they weren’t acclimated.
3. Frost, Cold, and Weather Damage
Mum blooms are vulnerable to cold snaps, heavy rain, and wind.
- Early light frost can nip open flowers and buds, turning petals translucent, then brown and limp.
- Heavy rain physically shreds petals and encourages botrytis (gray mold), which quickly browns flower heads.
- Repeated wet/dry cycles on blooms themselves speed up aging, shortening flowering time.
Crowded, unprotected plants exposed to these stresses brown much faster than sheltered, well‑spaced ones.
4. Root and Soil Problems
Roots need air as much as water. In compacted ground or dense, garden‑soil‑heavy potting mixes, mums’ roots can suffocate or rot.
Warning signs:
- Brown blooms coincide with dull, grayish foliage.
- The plant wilts even when the soil seems moist.
- When removed from the pot, roots are dark, slimy, or foul‑smelling instead of creamy and firm.
Diseases like Pythium or Phytophthora root rot take hold easily in waterlogged containers or beds without enough drainage.
5. Nutrient Imbalance and Fertilizer Burn
Mums appreciate rich soil, but overdoing fertilizer—especially high‑nitrogen lawn products or heavy synthetic feeds—can burn roots and leaf edges, leading to browning.
Common scenarios:
- Salt buildup in containers when there’s no periodic flushing.
- Heavy nitrogen late in the season causing soft, sappy growth that browns or collapses quickly.
Conversely, severely depleted soil can also cause faded color and weak blooms that brown fast, so balance is key.
6. Fungal Disease and Pests
While less common than simple stress, disease can be the culprit, especially in humid climates.
- Botrytis (gray mold) causes fuzzy gray patches on petals that quickly turn entire blooms brown.
- Powdery mildew leaves white film on foliage, stressing the plant and leading to early browning.
- Thrips can feed inside buds, turning them brown before they ever open.
Poor air circulation, overhead watering, and overcrowding all increase disease risk.
How to Fix Mums Already Turning Brown
Step 1: Remove Brown Blooms and Damaged Foliage
Start with a clean‑up.
- Snip off brown or mushy flowers back to a healthy leaf or side branch.
- Remove any obviously diseased leaves or stems and discard them (do not compost).
Deadheading not only improves appearance but also redirects energy to remaining buds and reduces fungal spread.
Step 2: Check Soil Moisture and Drainage
Use your fingers or a moisture meter to assess what’s happening below the surface.
If soil is bone‑dry several centimeters down:
- Give a deep soak at the base until water drains from the pot’s bottom or soaks well into the bed.
- In containers, water more frequently in hot weather—often 2–3 times per week, or even daily in small pots.
If soil is soggy or poorly draining:
- Stop watering until the top layer dries.
- Elevate pots on feet or bricks to allow air under the container.
- For severe root rot, unpot the plant, trim mushy roots, and repot into a fresh, well‑draining mix with perlite or coarse sand.
Step 3: Adjust Light and Placement
- If your mums are in deep shade and stretching, move them to a spot with at least 4–6 hours of direct sun.
- If they’re baking against a south‑facing wall or pavement and browning on the exposed side, shift them to a place with morning sun and afternoon shade.
When moving greenhouse or store‑bought mums outdoors, acclimate them gradually over a week by increasing daily sun exposure to avoid sunburn.
Step 4: Tidy Soil and Improve Airflow
- Gently thin overcrowded plants or containers packed tight together, so air can move around them.
- Remove fallen petals and leaves from the soil surface to reduce fungal spores and pests.
Better airflow helps buds dry after rain or dew, drastically cutting disease‑related browning.
Step 5: Rethink Fertilizer
If you suspect fertilizer burn or salt stress—common in potted mums:
- Water thoroughly several times over a few days to flush excess salts from the potting mix.
- Switch to a balanced, slow‑release fertilizer at modest rates, and avoid high‑nitrogen lawn products near mums.
For in‑ground mums in poor soil, a soil test and a gentle, balanced feed applied according to instructions can improve bloom quality without causing burn.
Step 6: Treat Disease If Needed
If you see powdery mildew, botrytis, or other clear disease signs:
- Remove and discard affected tissue.
- Improve spacing and switch to watering at the base instead of overhead.
- In severe cases, use an appropriate fungicide or a labeled organic product, following directions closely.
Long‑Term Prevention: Keeping Mums Vibrant Longer
1. Get Watering Consistent
Mums need even moisture—not feast and famine.
- Water when the top 2–3 cm of soil is dry, keeping the root zone lightly moist but never saturated.
- During peak bloom in warm weather, that can mean watering 2–3 times per week in beds and even more often in small containers.
- Always water at the base to keep petals and foliage as dry as possible.
Using drip irrigation or a simple soaker hose makes consistency much easier.
2. Plant in the Right Soil and Containers
- For pots, use a high‑quality, well‑draining potting mix—never straight garden soil—and ensure containers have drainage holes.
- In beds, amend heavy clay or compacted soil with several centimeters of compost to improve drainage and structure.
- Avoid low spots or areas where water collects after rain.
Healthy roots are your first line of defense against browning.
3. Manage Sun and Heat Intelligently
- Give mums at least 4–6 hours of sun daily for strong blooms, more in cooler climates.
- In very hot regions, provide light midday shade so petals don’t scorch.
- Gradually acclimate new plants to outdoor conditions over 5–7 days.
This balance keeps flowers bright without cooking them.
4. Use Mulch and Weather Protection
- Apply a light mulch layer to help maintain soil moisture and keep roots cool.
- Before forecasted frost or heavy rain, cover plants with a breathable cloth or temporary tarp, then remove it once conditions improve.
A few minutes of prep before bad weather can add weeks to your display.
5. Practice Good Hygiene and Spacing
- Deadhead regularly to remove fading blooms.
- Disinfect pruners after working on diseased plants.
- Space mums so their foliage just touches at maturity instead of forming an impenetrable mass.
Clean tools and adequate spacing go a long way in preventing fungal problems that cause browning.
FAQ Section
1. Why are my mum buds turning brown before they open?
Buds that brown and dry up before opening are usually suffering from drought stress, inconsistent watering, or thrips feeding inside the buds; check soil moisture, adjust watering, and inspect for pests.
2. My new mums turned brown right after I brought them home. What happened?
Plants moved directly from greenhouse or store conditions into full sun, wind, or very hot or cold spots often brown quickly from shock; acclimate them gradually and ensure the potting mix doesn’t dry out or stay waterlogged.
3. Are brown mums always diseased?
No—many cases are due to water, light, or temperature stress, and flowers naturally turn brown after their bloom period; disease is more likely if you see fuzzy mold, leaf spots, or a white powdery coating.
4. Can browned mums be revived?
You can’t turn brown petals back to color, but you can often save the plant by deadheading, fixing watering and drainage, improving light, and treating disease; new buds may still open cleanly.
5. How do I stop my mums from turning brown so quickly next year?
Plant in well‑drained soil, give 4–6 hours of sun with midday shade in hot climates, water consistently at the base, mulch lightly, space plants well, and protect blooms from early frost and heavy rainm.