How to Prepare Blackberry Bushes for Winter
How to Prepare Blackberry Bushes for Winter
If you grow blackberries, winter isn’t an off-season—it’s when you quietly decide how big and healthy next year’s harvest will be. Properly preparing blackberry bushes for winter is less about wrapping everything in fleece and more about knowing your canes, timing your pruning, and protecting the root zone so plants wake up strong in spring. In this guide, we’ll walk through a practical, expert-level winter prep routine that works for home gardens and small patches alike, covering primocanes vs floricanes, pruning, mulching, fertilizing, and cold protection in clear, step-by-step detail.
Why Winter Prep Matters for Blackberries
Blackberries are perennial plants with biennial canes: the root system lives for many years, while individual canes live for two seasons. In year one, primocanes grow vegetatively; in year two, those same canes become floricanes, bear fruit, and then die back. If you head into winter with a tangle of dead floricanes, stressed primocanes, and no mulch or moisture around the roots, you’re essentially gambling with next year’s crop.
Good winter preparation does three things: it removes dead or diseased wood, protects the living canes and crowns from extreme cold and desiccation, and sets up a clean, fertile, weed-suppressed bed for explosive spring growth. Done right, it can literally mean the difference between a sparse, disappointing harvest and canes so loaded you need to reinforce your trellis.
Step 1: Clean Up Fallen Fruit and Debris
Start winter prep as soon as fruiting has finished and foliage begins to decline—not after the first hard freeze.
Focus on:
- Raking up fallen fruit, mummified berries, and damaged fruit.
- Removing any rotting clusters still hanging on the canes.
- Clearing out dead leaves and plant debris if you had disease or pest problems.
Left on the ground, fallen fruit becomes a magnet for rodents, yellowjackets, and other pests, and it can harbor fungal spores that overwinter right under your plants. Compost healthy debris hot or dispose of it; don’t just rake it into the row.
Step 2: Understand Your Cane Types (Primocanes vs Floricanes)
You cannot prune blackberries intelligently until you can tell first-year canes from second-year canes.
- Primocanes: first-year canes that grow from the crown or roots, usually greener, more vigorous, and often taller by the end of the season. They typically don’t fruit (except in some primocane-fruiting types).
- Floricanes: second-year canes that bear fruit and then die. By late season they often look more woody, dull, and may show signs of wear or disease after harvest.
In standard summer-fruiting blackberries, floricanes should be removed after they fruit; primocanes are your investment in next year’s harvest and must be protected going into winter. Misidentifying them is one of the biggest reasons gardeners “prune away their crop.”
Step 3: Prune with a Winter Harvest in Mind
When to Prune
Most winter-related pruning for blackberries happens in two windows: immediately after harvest (removing spent floricanes) and during late fall or late winter for structural clean-up. The exact timing depends on your climate, but many experts advise starting when growth stops and average daily temperatures are steadily below about 10°C (50°F), indicating the plant is entering dormancy.
How to Prune Erect vs Trailing Varieties
Pruning techniques differ slightly depending on whether your variety is erect, semi-erect, or trailing.
For erect blackberries:
- Remove all spent floricanes at ground level as soon as possible after fruiting; they will not produce again.
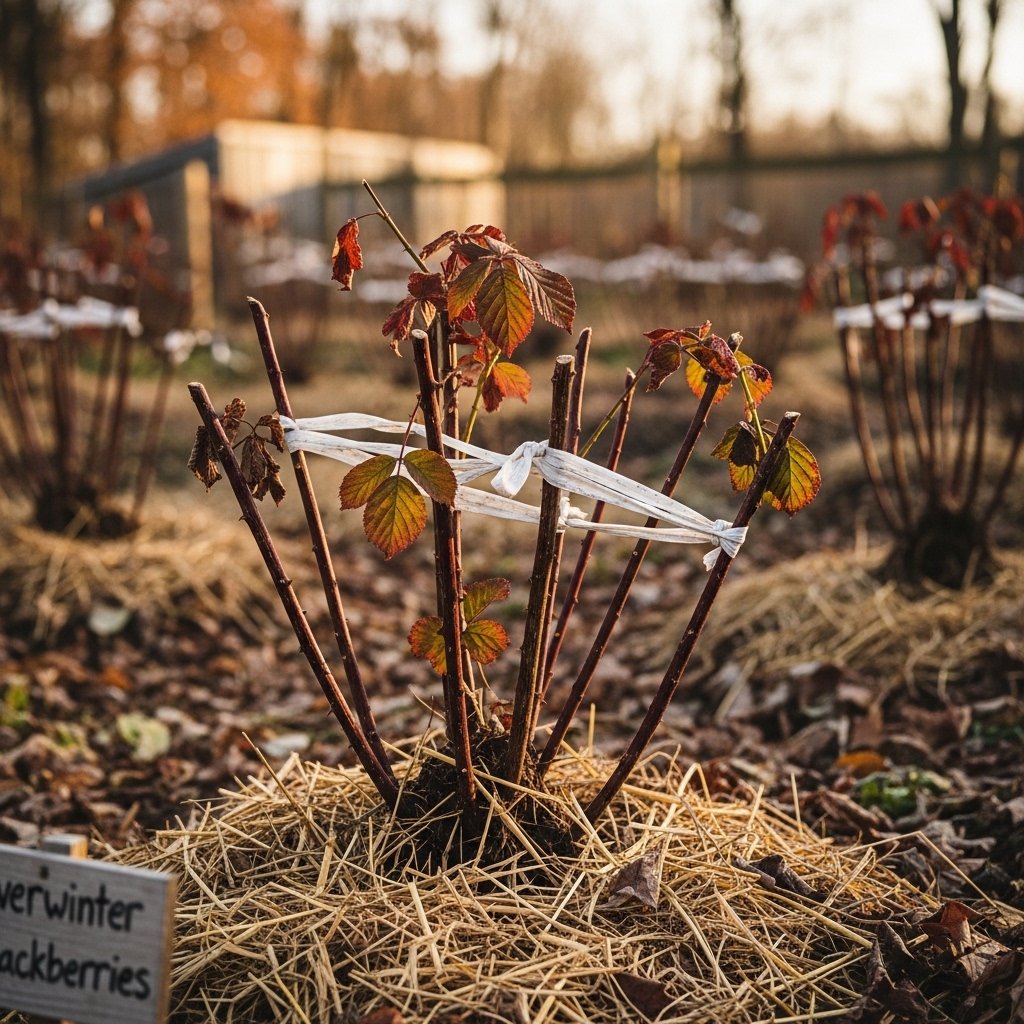
- In late fall or late winter, thin primocanes to the strongest 3–5 per plant, spaced several inches apart for airflow.
- Shorten lateral branches on each cane to roughly 30–45 cm (12–18 inches) to concentrate energy into fewer, larger fruit clusters.
- Tie remaining canes to your trellis in a gentle “V” shape for even support.
For trailing blackberries:
- After harvest, remove dead floricanes completely.
- Select healthy primocanes and shorten or “tip” them in late summer to encourage stronger, branching growth.
- Before deep winter, gently lower canes from their supports and lay them along the ground if you plan to mulch over them for cold protection.
Avoid aggressive, shaping-heavy pruning in late autumn; over-pruning can weaken plants and reduce winter hardiness.
Step 4: Test, Adjust, and Time Your Fertilizing
Winter prep is also a good moment to think about soil fertility—but this is where many gardeners go wrong.
- Blackberries generally prefer a slightly acidic soil pH in the 5.5–6.5 range.
- A simple soil test will tell you if you need to add lime (to raise pH) or sulfur (to lower pH).
- Phosphorus and potassium support root development, wood maturation, and stress tolerance.
If your soil test shows a need, apply phosphorus- and potassium-based amendments in late fall or winter, but avoid nitrogen once you’re past mid- to late summer. Nitrogen late in the season pushes soft, new growth that won’t harden off in time and is easily killed by frost.
The safest approach: meet major fertility needs in spring and early summer, then use late-season applications only to fine-tune P and K based on test results—not to “green things up” before winter.
Step 5: Weed Control and Bed Hygiene
Blackberry roots are relatively shallow, which means weeds are direct competitors for water and nutrients. Going into winter, you want your plants fully resourced, not sharing moisture with a mat of grass.
Best practices:
- Hand-weed or lightly cultivate the row, staying shallow to avoid root damage.
- Create mulched paths around plants to suppress future weed pressure.
- Avoid leaving thick, wet mats of weedy material around crowns where pests and rot can thrive.
A clean, mulched bed not only looks better but also improves airflow and reduces disease pressure when canes leaf out in spring.
Step 6: Watering Before the Ground Freezes
It’s easy to stop watering once the last berry is picked, but that’s a strategic mistake.
Blackberries need:
- Around 2.5–5 cm (1–2 inches) of water per week during the growing season, increasing up to about 10 cm (4 inches) during heavy fruiting for plump, juicy berries.
- Continued moisture in fall until the soil begins to freeze, so roots go into winter fully hydrated.
Dry soil plus freezing temperatures is a harsh combination that can desiccate fine roots and reduce spring vigor. Water deeply, less often, and taper off only when the ground is consistently cold and near freezing.
Step 7: Mulch for Root and Cane Protection
Mulching is arguably the single most important winter protection step you can take. It insulates the root zone, moderates soil temperature swings, retains moisture, and suppresses winter weeds.
Key guidelines:
- Apply mulch after soil temperatures have dropped but before hard freezes—typically late fall.
- Aim for a 7–10 cm (3–4 inch) layer around the crowns and along the row.
- Use breathable, organic materials such as shredded hardwood, straw (not hay), pine needles, or bark chips.
For trailing types in colder zones, you can lay canes on pre-mulched ground and cover them with a loose layer of straw or pine boughs for added insulation. Avoid piling mulch directly against cane bases to reduce rot risk.
Step 8: Smart Cold and Wind Protection (Without Suffocation)
How much extra protection your blackberry bushes need depends on variety and climate. Many cultivars are hardy to about -18°C to -23°C (0–10°F for tender types, -10°F for hardy ones), but colder snaps and wind can still damage exposed canes.
Options to consider:
- Planting or installing a windbreak on the windward side of your patch to reduce desiccating gusts and snow load.
- For very cold areas, loosely covering canes with breathable burlap, frost cloth, or straw for insulation—especially when you have only a few plants.
- For trailing types, laying canes down and lightly mulching over them rather than trying to wrap upright canes.
What you should not do is tightly wrap plants in plastic or non-breathable coverings. These trap moisture, create a greenhouse effect, and encourage rot and fungal disease, often causing more damage than the cold would have.
Step 9: Common Winter Prep Mistakes to Avoid
Even diligent gardeners get tripped up by a few recurring errors.
- Starting too late: Waiting until after the first hard freeze means plants have no time to acclimate, and tender tissues may already be damaged.
- Applying nitrogen in autumn: This triggers tender new growth that winter will quickly kill.
- Over-pruning in fall: Removing too much wood weakens plants and reduces cold tolerance.
- Skipping mulch or using it incorrectly: Bare soil or inconsistent mulching exposes roots to freeze–thaw damage; heavy, soggy mulch piled on crowns invites rot.
- Smothering plants with plastic covers: Poor airflow plus trapped moisture equals fungal disease and cane dieback.
Avoiding these pitfalls is often enough, by itself, to dramatically improve winter survival and spring performance.
Quick Winter Prep Checklist for Blackberry Bushes
For a fast, at-a-glance summary, here’s a streamlined checklist:
- Clean up fallen fruit, diseased berries, and leaf debris.
- Identify and remove spent floricanes; preserve healthy primocanes.
- Thin and shorten canes by type (erect vs trailing), and tie to a sturdy trellis.
- Test soil pH and nutrients; adjust P and K if needed, but avoid late nitrogen.
- Weed thoroughly and establish mulched paths or rows.
- Continue watering until the ground is close to freezing.
- Apply 7–10 cm of breathable mulch over the root zone; cover trailing canes in cold regions.
- Use windbreaks or breathable coverings in very cold, exposed sites; never wrap tightly in plastic.
FAQ Section
1. When should I start preparing my blackberry bushes for winter?
Begin winter preparation after harvest when shoot growth slows and average daily temperatures consistently drop below about 10°C (50°F), rather than waiting for the first hard frost.
2. Do I cut blackberries to the ground for winter?
No—only remove spent floricanes at ground level; healthy primocanes should be thinned, tipped, and tied but kept intact, as they will carry next year’s crop.
3. How thick should blackberry mulch be before winter?
Aim for a 7–10 cm (3–4 inch) layer of organic mulch over the root zone, applied after soils cool but before hard freezes, keeping it slightly away from cane bases.
4. Do blackberries need to be covered in snow-prone climates?
Hardy erect varieties often manage without heavy covering if well-mulched, but trailing or less hardy types benefit from canes being laid down and lightly covered with straw or pine boughs.
5. Should I fertilize blackberries in autumn?
Only if a soil test shows specific P or K deficits; avoid nitrogen in autumn, as it stimulates soft, frost-prone growth and can reduce winter hardiness.